Hi guys sorry it's been awhile but I'm finally getting around to doing this!! This is a step by step tutorial on how to turn a audio cassette tape into a kawaii necklace!! If you still have cassette tapes from the 80's up earlier 00's this is a good way to recycle them! Luckily I have a ton and if you like me to make a custom one you can commission me here: revans1@forum.montevallo.edu
Ok things you need are:
Cassette tape
Star beads (you can get them here: link )
Bows (got mine a hobby lobby, You can make them out of ribbon too)
Color Acrylic paint
Glitter paint coating (usually matching the paint color)
necklace clasps (I'm using lobster claws)
12 inch chain
at least 24 eye pins
7 jump rings (one needs to really big and thick and strong)
Tools to help make them (which are not pictured here)
Paint brush
Scissors
Needle Nose Pliers (I sometimes need two of them)
Strong Glue or Glue Gun
Remove all film from cassette tape (this may take awhile depend on how much) and cut it from the tape.
Start the first coat of paint, I will be hard to cover it completely, so you'll have to let it dry about 35 min to an hour.
While it's drying you can work on the chain:
You need a chain of about 12 inchs and cut into two chains of 6 inches.
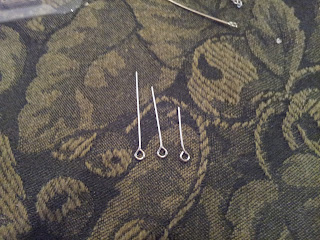
You need to use eye pins of middle length, the short one on the right is too short, the long one on the left you can use but you need to trim them while they're in the bead.
This is hard to describe so I'm linking a video: http://www.youtube.com/watch?v=Z7ep_C7R7U8
I usually connect the next eye pin before closing the loop:
Continue to do this for all the colors
I like to do two chains with the colors repeating twice on each chain
going from pink,peach,yellow,mint, sky blue to lavender two times on one chain
Once you've done at least one chain you can go paint another coat on the tape:
You may have to paint three coat on each side of the tape, it may look messy but you be add a glitter coat to make it shiny.
adding glitter will probably take only a few coats, it's transparent so that's why.
Once it's completely dry you can glue on deco stuff, I chosse to give it a bow and stars.
Next you much break the tab near the bow (or on both sides if you want the chains to attach to both)
Take the big jump ring and open it up like this^
This is the tricky part. I suggest putting it in the hole in the at the top first and then pushing it down, It needs to be secure, if it jiggles at all that's not good! You must tighten the jump ring again until it fits snug! Sometimes depending on the model of the cassette tape you might have to use glue to secure it.
Once that's done you can attached the chains with the smaller jump rings! Two to the big one and two to the ends. Don't attach the clasp just yet.
Now you can attached the plain chain to the star chains and the clasp to the left one (if you right handed) and a ring to the other. And you're done!!!
Please enjoy you new necklace! and I if you do try this tutorial please comment and tell me how it goes!! ^_^


